
Saint Patrick’s Day is fast approaching… if I didn’t miss it already. It’s a great time of year to be Irish and have a love of ales. This week I decided to create a St. Patrick’s Day Wallpaper from my favorite drink. Guinness. So let’s begin.

To start download and unzip the asset-pack here. These are going to be the major contributors to our design. I made asset01 very large to make removing aspects of the design easier. I you would like a copy of the ai file please leave a comment at the end of the tutorial and I will send you a copy. Enough rambling… Open a new document in PhotoShop. We are going to make the size of this 1920×1080(You can make it the size of your resolution but for the purpose of this tutorial I am using mine). Then add a gradient overlay and Set the start color to #3A3A3A and the end color to #0D0D0D.

Now that we have our base we are going to make our green bar. So first we need to add 3 guides. The first will be the center of the wallpaper width, or 960. Next two will be horizontal guides at 500 and 800 respectively. Then make a selection within these guides, make a new layer and fill is with black. Now we are going to add a gradient overlay. This gradient will have five colors. The first will be color #004400 at location 0, the second will be color #026801 at location 20, the middle color will be #037702 at location 50, the fourth will be #207d18 at location 80, and the final color is #3F9631 at location 100.

Next we need to add two new horizontal guides (first at 50 and the second at 1030). These will serve as the bounding area, meaning no design element will be placed out of these guide areas. Now select your custom shape tool and select “Sign 6″ from the windows default shapes. Hold the shift key drag out the shape from the top binding guide to the bottom. Then fill the shape with black. Now we are going to add a angled gradient (four colors). Set the first to #B8B8B8 at location 0, the second at location 35 in color #C9C9C9, The third color #E0E0E0 at location 75, and the last at location 100 and the color set to #F7F7F7.

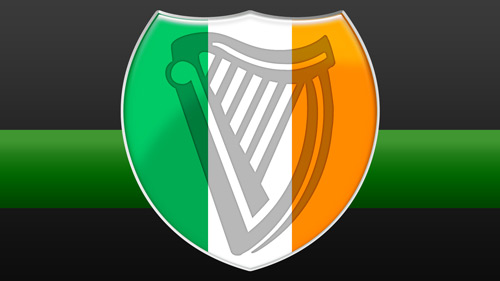
Make a selection of the shield and go to Selection > Modify > Contract (by 10). Fill the selection on a new layer with color #009543. Then add a Bevel and Emboss. Set the style to outer bevel, chisel hard, depth 100, Direction down, and the size to 10.

Now we are going to make the Irish flag on the shield. Make a selection 320 pixels on the right side of the shield and fill with #FF7300.

Then make the same size selection of the center and fill it with white.

Duplicate the inner green shield layer and move it to the top. Now we are going to change the blending options. We are adding five blending options:
Drop Shadow
- Color: 606864
- Opacity: 34%
- Angle: 120
- Distance: 5
- Spread: 3
- Size: 5
- Color: 828385
- Opacity: 85%
- Angle: 90
- Distance: 11
- Choke: 25
- Size: 22
- Color: 3a3a3a
- Opacity: 50%
- Choke: 0
- Size: 8
- Style: Inner Bevel
- Technique: Smooth
- Depth: 100
- Size: 11
- Soften: 3
- Contour: Gaussian
- Size: 1
- Position: Inside
- Depth: 100
- Opacity : 10
- Color: 000000
- Contour: Gaussian

Duplicate the previous layer. Remove all the old blending options and add a new bevel and emboss:
Bevel and Emboss
- Style: Inner Bevel
- Technique: Smooth
- Depth: 42
- Size: 27
- Soften: 14
- Contour: Half Round

Next make a selection of the inner shield, make a new layer and fill it with white. Then cut an arch from the top of the white area. Hide the new layer and select the bottom of the white area. Go to Filter > Blur > Gaussian Blur and blur the layer 20.0. Set the layer blend to overlay and the fill to 20%.

Un hide the top section and follow the previous steps. Only this time set the fill to 50%.

Now that we have our base shapes created we can start cutting our asset01 up. Make a selection of the harp in Asset01 and copy it to a new layer. Move it into wallpaper and scale it to fit inside our shield. Set the layer fill to 0%. Then add a black color overlay with a 50% Opacity. Next add an Inner Shadow. Set the blend to overlay, the color set to black, the opacity to 75%, the distance and choke to 0, and the size to 11.
Now grab asset02 and add it to our wallpaper. Make a selection of the shield and cut it out of Asset02. Delete the excess. Makes a selection of the harp and cut that from the shield shape. Set the shield shape layer blend to soft light.

Set the new harp shape to soft light as well. Set the layer fill to 20%.

Now add two vertical guides 50 pixels from either side. Now go back to Asset01 and cut out the red signature. Add it to our wallpaper and scale it down roughly to 20%. Place it 40 pixels above the bottom boundary guide.

Grab your font tool and select the “Copperplate Gothic Bold” face. Set the font size to 30 and the color to #d3d1d2. Then type out “Please Drink Responsibly” and align ing with the right side of the signature.

Next cut our “Guinness” from asset01. Make two copies in our wallpaper. Scale the first to 20 pixels larger then the green bar. On the first make sure the “N” fit snugly inside the green bar. Then add a gradient overlay and Set the start color to #e8e6e7 and the end color to #646464. Lastly add a drop shadow. Set the angle to 120, distance to 10, and the size to 5.

On the larger one cut the selection inside the shield to a new layer and delete the excess. Set the layer to a black color overlay set the opacity to 25%. Set the layer fill to 0%. Then add a 20.0 pixel Gaussian blur.

Next select the word “Draught” and copy it to our document. Shrink the ext down roughly 75%. Then add the same gradient overlay as the background layer from step one.

Now duplicate this layer. Then select the original layer and add a 10 pixel Gaussian blur. Then nudge the blurred layer 10 pixels to the right and down. Set the layer blend to luminosity.

Grab your font tool and select the “Copperplate Gothic Bold” face. Set the font size to 47 and the color to #010101. Then type out “A True St. Patrick’s Day Standard” and aligning with the top of the G in “Guinness”. Place it in the center of the shield. Lastly add a Drop shadow. Set the opacity to 30%, the distance to 5, the spread to 0, and the size to 8.
Webmaster Tools: Creating A St. Patricks Day Beer Wallpaper >>>>> Download Now
ReplyDelete>>>>> Download Full
Webmaster Tools: Creating A St. Patricks Day Beer Wallpaper >>>>> Download LINK
>>>>> Download Now
Webmaster Tools: Creating A St. Patricks Day Beer Wallpaper >>>>> Download Full
>>>>> Download LINK 9B